Tutorial: Learning Hydra for configuring ML experiments
Over the last month, I have been exploring Hydra for configuring and managing machine learning experiments. Despite its simplicity, it is an incredibly powerful tool for a lot of scenarios, building on the flexibility of OmegaConf, a large community base, and a number of additional plugins.
This post is intended as a short, self-contained introduction to this tool. I overview a number of topics, including how to instantiate classes, run sweeps over parameters, and validate the configuration at run-time. The selection is biased by what I found most useful in practice, and does not cover the full range of options given by Hydra. For these, I invite you to read the original documentation.
🔗 The code for this tutorial is available on a GitHub repository: https://github.com/sscardapane/hydra-tutorial.
Installation and overview
We will use the upcoming 1.1 version of the library, which you can install as:
pip install hydra-core==1.1.0.rc1
⚠️ A warning: several instructions below will not work properly on previous versions of the library. All the changes between versions are documented on the website.
Some code is based on PyTorch, but it can adapted easily to other deep learning frameworks. We consider a classical fine-tuning scenario, where we fine-tune a small classification model on top of a pre-trained convolutional neural network. Our final configuration will be like this (do not worry if you do not perfectly understand this figure right away):
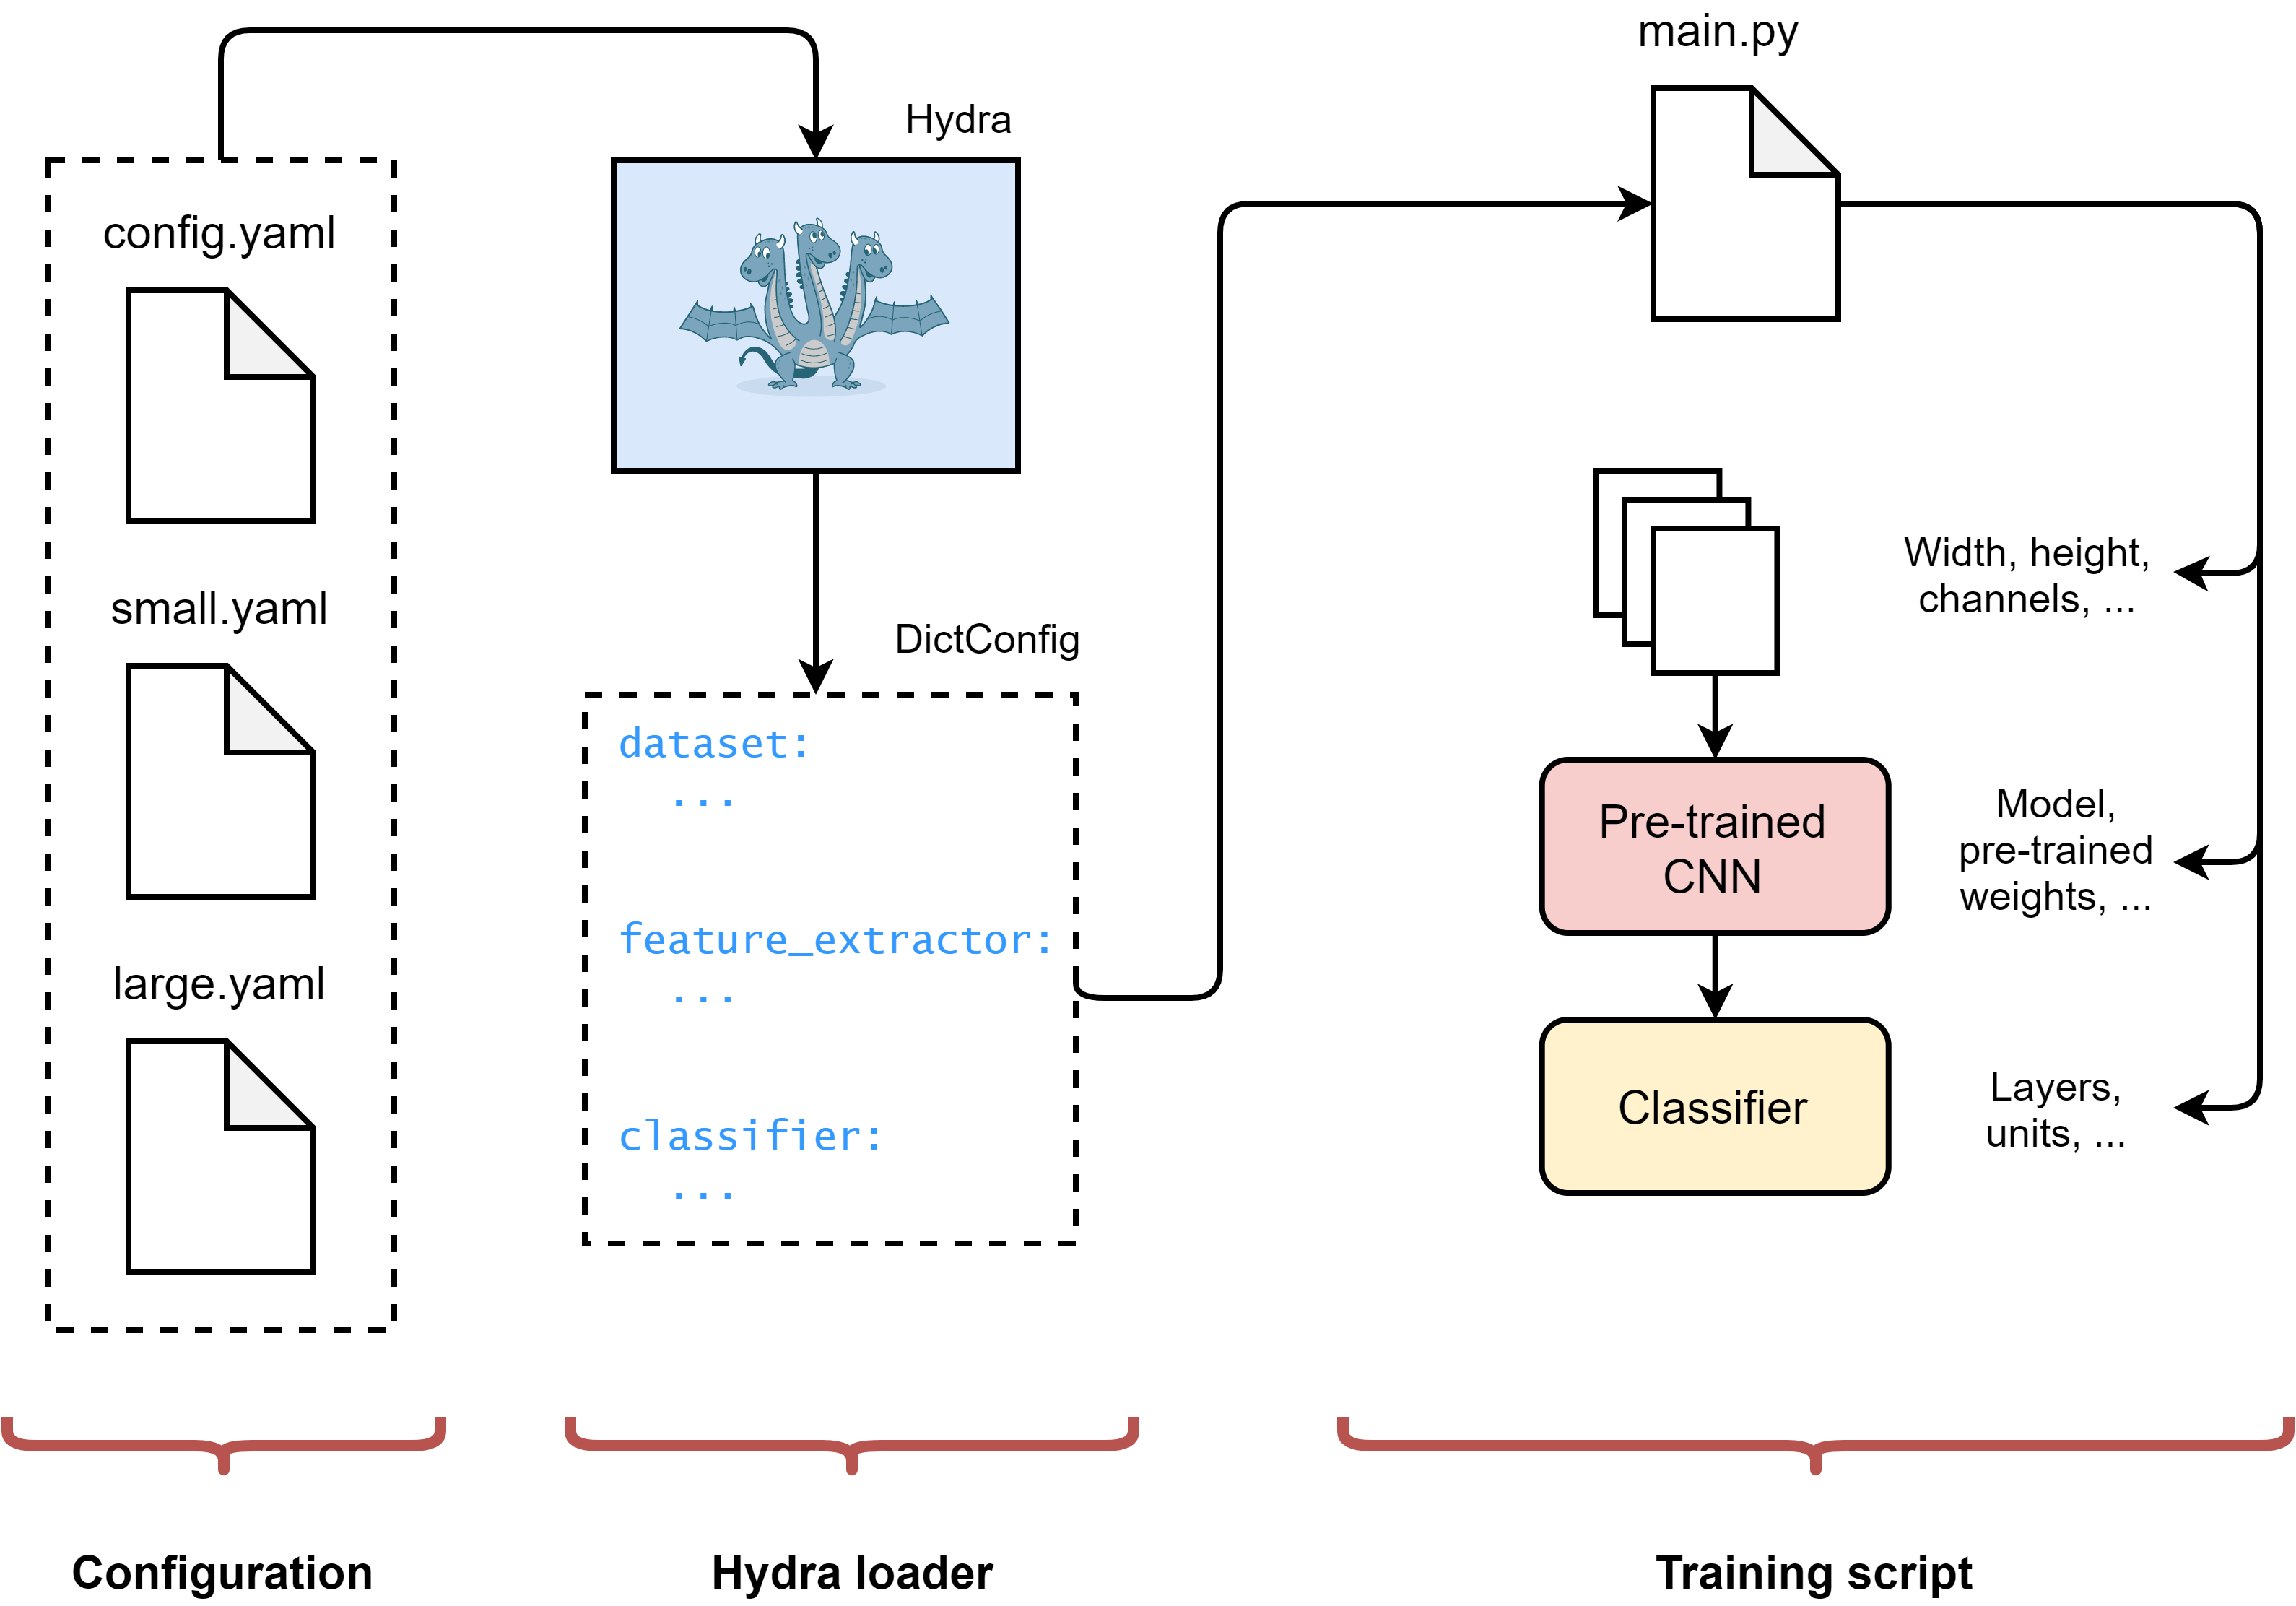
On the left we have a number of configuration files, describing in turn:
- The configuration for the dataset;
- The configuration of our pre-trained network;
- The configuration of our classifier trained on top of the pre-trained network.
On the center, Hydra automatically loads and composes our configuration files, dynamically overriding any value we request at runtime. On the right side, our training script exploits the resulting dictionary-like object to build our model.
We will build this setup step-by-step, learning about a number of Hydra functionalities in turn. With this in mind, let us dive in!
First steps: manipulating a YAML file
While there is a huge number of ways to specify a configuration file, Hydra works with YAML files. We start by creating a simple config.yaml file with some details about our (fake) image dataset:
# config.yaml
dataset:
  image:
    size: 124
    channels: 3
  classes: 10
OmegaConf is a simple library to access and manipulate YAML configuration files:
from omegaconf import OmegaConf
conf = OmegaConf.load('config.yaml')

# Accessing values (dot notation or dictionary notation)
print(conf.dataset.image.channels)
print(conf['dataset']['classes'])

# Modifying a value
conf.dataset.classes = 15
The configuration is loaded as a DictConfig object, which provides a few additional functionalities (notably nesting) with respect to Python primitive containers. You can read more about OmegaConf and DictConfig on the official documentation. A lot of advanced functionalities in Hydra build on top of it, making it a very useful reading.
Loading and manipulating the configuration in a script
Hydra’s main purpose is to provide a simple way for automatically loading and manipulating the configuration file in a script. To do this, we decorate our main function with hydra.main:
@hydra.main(config_name='config')
def train(cfg: DictConfig):
    # We simply print the configuration
    print(OmegaConf.to_yaml(cfg))

if __name__=='__main__':
    train()
When we call our script, the configuration is automatically loaded:
python main.py
# Out:
#   dataset:
#     image:
#       size: 124
#       channels: 3
#   classes: 10
We can modify all parameters on-the-fly using Hydra’s override syntax:
python main.py dataset.classes=15
# Out:
#   dataset:
#     image:
#       size: 124
#       channels: 3
#   classes: 15 <-- Changed
The syntax also allows for adding or deleting parameters using, respectively, +parameter_to_add and ~parameter_to_remove.
Manipulating loggers and working directories
By default, Hydra executes each script inside a different directory, to avoid overwriting results from different runs. The default name for the directory is outputs/<day>/<time>/.
Each directory contains the output of your script, a .hydra folder containing the configuration files used for the run, and a <name>.log file containing all the data that was sent to the logger. In this way, we can easily log and store additional information about our run:
import os, logging
logger = logging.getLogger(__name__)

@hydra.main(config_path='configs', config_name='config')
def train(cfg: DictConfig):

    # Log the current working directory
    logger.info(f'Working dir: {os.getcwd()}')

    # ...
If we execute the script, all log messages are printed on screen, and saved in the corresponding .log file:
python main.py
# Out: [2021-05-20 13:11:44,299][__main__][INFO] - Working dir: c:<...>\outputs\2021-05-20\13-11-44
Hydra’s configuration is also specified in a number of YAML files, which are automatically loaded and merged to our own configuration when running the script, making it easy to customize the behaviour of the library. For example, we can change the working directory for a certain run:
python main.py hydra.run.dir='outputs/custom_folder'
# Out: [2021-05-20 13:13:48,057][__main__][INFO] - Working dir: c:<...>\outputs\custom_folder
If you want to overwrite the configuration for any run of your script, you can add it to the configuration file. For example, to modify the output of the logger.
Loading the configuration outside of a script
Sometimes, we might need to load our configuration file outside the main function. While we can do this with OmegaConf, it does not provide all the features available in Hydra, including most of what we will introduce in the following.
The Compose API provides an alternative way to load configuration files. It is especially useful inside Jupyter Notebooks, or if we want to unit test certain functions that depend on Hydra. To load the configuration file, we first need to initialize Hydra (only once per kernel), and then load the file:
from hydra import initialize, compose
initialize('.') # Assume the configuration file is in the current folder
cfg = compose(config_name='config')
⚠️
initializecan be called only once. To use it locally, you can initialize inside a temporary context:with initialize('.'): # ...This is extremely useful for unit testing. The Compose API also has alternative versions for obtaining configuration files from absolute paths or modules.
Parameters can also be overwritten when composing the configuration, as shown in an example below. Finally, if we initialized Hydra outside of a context, and at any point we need to reinitialize it, we can reset its internal state:
hydra.core.global_hydra.GlobalHydra.instance().clear()
Instantiating objects
Let us continue our configuration file. The next step is configuring the details of our pre-trained network. Since there is a large number of pre-trained convolutional networks inside PyTorch, we would like to leave this choice as a hyper-parameter.
Luckily, Hydra has a simple syntax for instantiating objects or callables. First, we add this to our configuration file:
feature_extractor:
  _target_: torchvision.models.alexnet
Note the special _target_ key to specify the class. We can use hydra.utils.instantiate to create an object of the class as the first step of our complete model:
import torch
from hydra.utils import instantiate

net = instantiate(cfg.feature_extractor)
We can pass parameters during instantiation by adding additional keys to the configuration file. For example, we can specify whether we want to load the pre-trained weights or not (note that pretrained must be a valid parameter for our target class):
feature_extractor:
  _target_: torchvision.models.alexnet
  pretrained: True
This requires no changes to our training script, as all the parameters will automatically be passed when instantiating the model.
Variable interpolation
Next, we need to configure our small classifier on top of the pre-trained network. To simplify this, we can use a number of useful things introduced in the latest Hydra release:
- Recursive instantation allows to recursively instantiate nodes provided they have a
_target_key. - It is possible to specify positional arguments during instantiation with the
_args_keyword.
With these tools, here is an example of instantiating a torch.nn.Sequential object with two layers:
_target_: torch.nn.Sequential
_args_:
  - _target_: torch.nn.Linear
    in_features: 9216
    out_features: 100

  - _target_: torch.nn.Linear
    in_features: ${..[0].out_features}
    out_features: ${dataset.classes}
We are also using a nice feature of OmegaConf called variable interpolation, that allows us to automatically specify the parameters for our last layer by gathering them from the rest of the configuration file. In addition, OmegaConf 2.1 (released with Hydra 1.1) introduces relative interpolation, allowing us to write the in_features key above as in_features: ${..[0].out_features}.
We can instantiate all objects as before:
print(instantiate(cfg.classifier))
# Out:
# Sequential(
#   (0): Linear(in_features=9216, out_features=100, bias=True)
#   (1): Linear(in_features=100, out_features=10, bias=True)
# )
At this point, we can stack our classifier on top of the pre-trained network:
classifier = instantiate(cfg.classifier)
net.classifier = classifier
⚠️ We are assuming the pre-trained network has a field
classifier. A more flexible option would be to add this in the configuration file itself.
It is worth mentioning that variables are resolved only when the corresponding fields are accessed. However, we can modify our script to print the configuration with all the variables resolved, for easier debugging:
print(OmegaConf.to_yaml(cfg.classifier, resolve=True))
# Out:
# _target_: torch.nn.Sequential
# _args_:
# - _target_: torch.nn.Linear
#   in_features: 9216
#   out_features: 100
# - _target_: torch.nn.Linear
#   in_features: 100
#   out_features: 10
Configuration groups
In practice, we would like to have multiple configuration files, specifying different types of models, e.g., the small classifier above, and a larger one composed of more layers. We can achieve this using Hydra’s configuration groups.
We first group our configuration files inside a configs folder, containing our previous config.yaml file, and a classifiers folder containing two YAML files: small.yaml (small classifier configuration), and large.yaml (large classifier configuration). The final working directory looks like this:
+--main.py
+--configs/
|  +--config.yaml --> Main configuration
|  +--classifiers/
   |  +--small.yaml --> Small classifier
   |  +--large.yaml --> Large classifier
We can specify a default value for our classifier using the default list, a special config node that Hydra uses to build the final configuration file. Practically, we insert the following as a root object in config.yaml:
defaults:
  - classifier: small
Inside our training script, the classifier will be accessible as cfg.classifier, and we can override its value at any time:
python main.py classifier=large
Executing multiple runs
One interesting consequence of having independent folders for each run is that we can easily perform multiple experiments by sweeping over certain parameters, and then analyzing the results by looking at each folder in turn. For example, we can launch two runs with the two classifiers as follows:
python main.py -m classifier=small,large
# Out:
# [2021-05-20 16:10:50,253][HYDRA] Launching 2 jobs locally
# [2021-05-20 16:10:50,254][HYDRA] 	#0 : classifier=small
# ...
# [2021-05-20 16:10:50,370][HYDRA] 	#1 : classifier=large
# ...
The -m flag (alternatively, --multi-run) instructs Hydra to perform a sweep. There are different ways for specifying the sweep range besides a list. Hydra also supports a number of external launchers and sweepers, which are not covered in this post.
Validating the configuration with a schema
We conclude this rather lengthy overview of Hydra with a final interesting possibility: validating at run-time the parameters by specifying a configuration schema.
👀 Schemas can also be used as an alternative to YAML files, but we do not cover this use here. See the official documentation.
For simplicity, we only show how to validate the parameters for the dataset, and we leave the rest as an exercise. First, we define in our code a nested set of dataclass classes mimicking our configuration, and declaring the types using type hints:
@dataclass
class ImageConfig:
    size: int
    channels: int

@dataclass
class DatasetConfig:
    image: ImageConfig
    classes: int

@dataclass
class MainConfig:
    dataset : DatasetConfig
    feature_extractor: Any
    classifier: Any
The ConfigStore provides a single interface to communicate with Hydra’s internals. In particular, we can use it to store our schema as follows (note the name we assign to the schema):
cs = hydra.core.config_store.ConfigStore()
cs.store(name="config_schema", node=MainConfig)
Inside our configuration file, we can associate a schema by listing it inside the default list:
defaults:
   - config_schema
Now, if we try to override a parameter with an improper type, the code immediately fails:
python main.py dataset.classes=0.5
# Out:
# Error merging override dataset.classes=0.5
# Value '0.5' could not be converted to Integer
#    full_key: dataset.classes
#    reference_type=DatasetConfig
#    object_type=DatasetConfig
That’s it! I hope you enjoyed my tutorial on using Hydra. Remember that all the code described here can be found on a GitHub repository: https://github.com/sscardapane/hydra-tutorial. For any feedback, do not hesitate to contact me.
You can also follow me on Twitter for almost daily updates.